
Complete Guide to 10×10 Gazebo Assembly: Step-by-Step Instructions for Your Outdoor Living Space. Discover our Complete Guide to 10×10 Gazebo Assembly! Get easy, step-by-step instructions to elevate your outdoor living space today.
Understanding 10×10 Gazebo Assembly: Key Features & Use
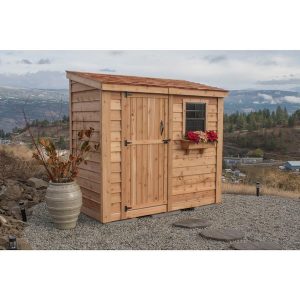
A 10×10 gazebo serves as a stylish addition to outdoor spaces. It offers a protected area for relaxation & social gatherings. This structure enhances aesthetics while providing shade from sun & shelter from rain.
Evolution of Gazebo Structures: A Historical Perspective
Gazebos have a rich history, dating back to ancient civilizations. They originally functioned as places of rest & leisure. Over time, designs evolved to include different materials & styles. Modern gazebos combine functionality with design, catering to contemporary tastes.
Effective Steps for Assembling Your 10×10 Gazebo
Follow these practical steps for successful assembly:
- Gather all necessary tools & equipment before starting.
- Read the manufacturer’s instructions thoroughly for specifics.
- Prepare the location by leveling the ground appropriately.
- Organize parts systematically for efficient access during assembly.
- Match components according to the provided assembly guide.
- Ensure a secure structure as you connect each part carefully.
- Double-check all connections to guarantee stability.
Advantages of Assembling a 10×10 Gazebo
Constructing a gazebo offers numerous benefits:
- Enhances outdoor living space functionality & appeal.
- Provides a designated area for gatherings & events.
- Increases property value through improved landscaping.
- Offers shelter from sun, rain, & wind.
- Can serve as a focal point in gardens or patios.
Tackling Common Challenges During Gazebo Assembly
Assembly may present obstacles. Here are solutions to common issues:
- Alignment problems? Use a level during setup.
- Missing parts? Contact the manufacturer for replacements.
- Difficulty interpreting instructions? Watch tutorial videos for clarification.
- Weather changes? Plan assembly on clear days to avoid delays.
Future Trends in 10×10 Gazebo Designs & Assembly
Upcoming designs focus on sustainability & innovation. Eco-friendly materials are increasingly preferred. Smart features like integrated lighting & sound systems rise in popularity. Expect customization options that allow for personalization based on user preferences.
Complete Guide to 10×10 Gazebo Assembly: Step-by-Step Instructions for Your Outdoor Living Space
Essential Tools for 10×10 Gazebo Assembly
Gather the right tools to set up your gazebo. Proper tools make assembly smoother. Here is a list of essential items:
- Measuring tape – For accurate measurements.
- Screwdriver – Use both Phillips & flat-head types.
- Drill – Needed for fast assembly.
- Rubber mallet – Prevent damage to parts.
- Level – Ensure the gazebo is even.
- Wrench set – For tightening bolts.
- Safety goggles – Protect your eyes during assembly.
Having these tools will help you follow the Complete Guide to 10×10 Gazebo Assembly: Step-by-Step Instructions for Your Outdoor Living Space smoothly. Always check your tools before starting.
Choosing the Right Location for Your Gazebo
The right location enhances the functional value of your gazebo. Ensure you choose an area that is flat & stable. Consider these factors:
Sunlight Exposure
Determine the sunlight patterns in your yard. A gazebo can provide shade. Select a spot that avoids excessive sun exposure in hot months. Consider morning sunlight for a bright start, & afternoon shade for comfort.
Accessibility
Ensure easy access to your gazebo. It should connect to pathways. Avoid isolated spots that might feel remote. Think about nearby seating arrangements.
Proximity to Utility Lines
Stay away from overhead wires. Check for buried utility lines before digging. Contact local utility companies if unsure about the locations.
“Selecting a proper location is key for your gazebo experience.” – Emily Moore
Preparing the Ground for Your 10×10 Gazebo
Preparation is important before assembly. The ground must be secure & level. Follow these steps:
Clearing the Area
Clear your chosen spot of any debris, rocks, or vegetation. A smooth surface avoids complications during assembly. Cut down any grass or weeds to make the ground accessible.
Leveling the Ground
Use a shovel to level the area. If the ground is uneven, fill low spots with dirt. Compact the ground to avoid settling later. A level surface ensures your gazebo stands firm.
Creating a Solid Foundation
Build a solid base for your gazebo. You can use concrete blocks or gravel. Concrete pads give extra stability. If you choose gravel, ensure it’s packed tightly.
Reading the Gazebo Assembly Manual
Before starting, read the assembly manual carefully. Manuals contain vital information. Follow these tips:
Identifying Parts
Familiarize yourself with all parts listed. Count & match parts before assembly. This helps you identify missing pieces early. Look out for any unique tools needed for specific parts.
Understanding Assembly Steps
Follow the steps in order. Manuals usually show a clear sequence. Skipping steps leads to errors. Make notes of important instructions.
Expected Assembly Time
Check the estimated assembly time. Prepare accordingly. Plan for breaks & extra help if needed. An efficient plan results in faster assembly.
Step-by-Step Assembly Instructions
Use these detailed steps to assemble your gazebo. Stick to the numbers for clarity. Do one section at a time:
Assemble the Base
Start by connecting the base pieces. Lay out the parts according to the instructions. Use screws & a drill for secure attachment. Check that all corners are square.
Attach the Vertical Posts
Once the base is ready, attach the vertical posts. Ensure each post stands vertically. Secure them with bolts. Each post supports the structure.
Add the Roof Frame
Next, place the roof frame on top of the posts. Align each piece according to the manual. Attach firmly using screws. Ask for help if parts are heavy.
Install the Roof Panels
After the frame, install the roof panels. Make sure panels interlock correctly. Secure them with bolts & screws. Check for any gaps that need filling.
Adding Finishing Touches to the Gazebo
The finishing touches add charm to your gazebo. Consider these optional additions:
Painting or Staining
Protect the wood by adding paint or stain. A protective coat enhances durability. Choose colors that match your outdoor decor. Apply the paint evenly for a polished look.
Decorative Elements
Add decorations to enhance the aesthetic. Use outdoor-friendly lights. Consider adding curtains for privacy. Potted plants around the gazebo enhance the outdoor space.
Furnishing Your Gazebo
Choose furniture that suits your style. Comfortable seating invites relaxation. Consider adding a table for dining or games. Arrange furniture for easy movement & comfort.
Maintaining Your 10×10 Gazebo
Regular maintenance keeps your gazebo in good shape. Follow these tips for long-term care:
Inspecting for Damage
Regularly check for any visible damage. Look for rust, rot, or loose screws. Early detection helps prevent major repairs. Schedule inspections every season.
Cleaning
Keep your gazebo clean. Remove any debris, dirt, or leaves. Use a gentle detergent for tough stains. Regular cleaning maintains its appearance & prolongs life.
Seasonal Preparations
Prepare your gazebo for seasonal changes. In winter, clear snow & ice. In autumn, consider removing curtains to prevent weather damage. Always adapt care based on weather conditions.
Common Mistakes to Avoid During Assembly
Watch out for common errors during assembly. These mistakes can complicate your work. Avoid these pitfalls:
Ignoring the Manual
Skipping the assembly manual leads to confusion. Always follow the detailed steps. Ensure you understand each part’s function.
Forgetting Safety Precautions
Neglecting safety can result in injuries. Always wear safety glasses & gloves. Keep the area clear of hazards.
Rushing Through the Process
Taking shortcuts may lead to mistakes. Move at a steady pace. Ensure every step is done correctly before moving on.
The Benefits of a 10×10 Gazebo in Your Outdoor Living Space
A gazebo adds value to your yard. It provides comfort & enhances aesthetics. Consider these benefits:
Expanded Living Area
A gazebo creates additional space for relaxation. Use it for gatherings, meals, or quiet time. It becomes a focal point in your outdoor environment.
Increased Property Value
Install a gazebo to boost your property’s value. Potential buyers see it as an attractive feature. Well-built structures enhance outdoor appeal.
Protection from Elements
A gazebo offers shelter from sun & rain. It allows for outdoor enjoyment even in bad weather. Spend more time outside in your garden.

What is a 10×10 Gazebo?
A 10×10 gazebo is a type of outdoor structure. It offers shade & shelter. Many people use it to relax or entertain guests. This size is perfect for small spaces. It fits well in gardens or patios. You can also use it for outdoor events like parties or family gatherings. The design allows for ventilation & light. It often includes a roof & open sides. This gives a warm feeling while protecting you from the sun & rain.
Benefits of Having a Gazebo
Owning a gazebo adds value to your home. Here are some key benefits:
- Protection from the weather
- Increased outdoor living space
- Beautiful aesthetic appeal
- Perfect for gatherings & celebrations
- Provides a reading or relaxation spot
Many homeowners find gazebos enhance their garden’s beauty. A beautiful gazebo can improve your yard’s appearance. It also creates a welcoming spot for friends. You can decorate it with lights or flowers. This design adds a cozy touch to your outdoor area.
Tools & Materials for Assembly
To build a gazebo, you need specific tools & materials. First, gather your tools:
- Drill
- Screwdriver
- Measuring tape
- Level
- Hammer
Next, prepare your materials. You will need:
| Material | Quantity |
|---|---|
| Wood beams | 12 |
| Roof panels | 8 |
| Screws | 100 |
| Concrete blocks | 4 |
Having the right tools & materials helps you work efficiently. It ensures you complete the assembly successfully. Remember, good preparation is key.
Preparing the Site for Your Gazebo
Choose a flat area for the gazebo. Measure the space carefully. Clear any obstacles such as rocks or plants. A flat foundation is essential. You can use gravel or concrete for stability. Set markers in the corners. This will help keep the structure square. Make sure you have enough space around the gazebo for movement.
Check local laws about building outdoor structures. Some areas have rules about permits. You may need approval before starting. Also, consider the sun’s direction. Placing the gazebo for shade will improve comfort. Survey your yard & choose wisely.
Step-by-Step Assembly Guide
Follow these easy steps for your gazebo assembly. Start with the base. First, lay out the four concrete blocks. Use the level to ensure they are even. These blocks act as the foundation. Next, attach the wood beams. Connect them to form a square frame. Secure each beam with screws. Make sure it is sturdy.
Continue by adding vertical posts. Secure them at each corner of the frame. Use your drill to fix them in place. After this, attach the cross beams. These beams support the roof. Make sure they align well. Then, start adding the roof panels. It may require two people to lift them. Secure them with screws to finish the roof.
Finally, check all connections. Ensure everything is tight & secure. Your gazebo should be stable & ready for use.
Decorating Your Gazebo
A gazebo is a blank canvas for your creativity. After assembly, you can decorate it. Begin with outdoor furniture. Choose comfortable chairs & a table. You can add cushions for extra comfort. Use colors that match your garden. Next, consider lighting options. String lights or lanterns set a lovely mood.
- Choose theme colors
- Add flower pots
- Incorporate outdoor rugs
- Hang decorative items
- Incorporate wind chimes
Flowers & plants enhance the gazebo’s beauty. Hang flower baskets on the posts. A few plants around the base add life. Add a personal touch with decorations that reflect your style. It can be a place of relaxation & enjoyment.
Maintenance Tips for Your Gazebo
Maintaining your gazebo is easy. Regular cleaning helps keep it looking fresh. Use a soft brush to remove dirt & leaves. Wash the wood with soap & water to avoid mold. Inspect the structure at least once a year. Look for any loose screws or damaged wood. This ensures safety & durability.
After heavy rains or storms, check the roof. Inspect for leaks or damages. Treat the wood with sealant every few years. This protects it from weather elements. Keeping your gazebo in good condition boosts its lifespan. Regular care makes a wonderful outdoor space.
Personal Experience with Gazebo Assembly
When I assembled my 10×10 gazebo, I felt excited. I planned it for weeks. Gathering tools & materials took time. On assembly day, I invited friends. Together we tackled each step. We laughed while measuring & drilling. It felt rewarding to see the structure take shape. Once finished, we celebrated with food & drinks. Our gazebo is now a cherished space for relaxation.
Why Choose a 10×10 Gazebo?
A 10×10 gazebo is a perfect choice for multiple reasons. First, it fits various yard sizes. Large yards benefit, & small yards do too. It adds charm to every corner. As well as, it’s affordable compared to bigger models. You don’t compromise on style or function.
This size is also flexible. You can use it for parties or quiet evenings. It serves many purposes. Organize outdoor dinners or family gatherings. Your friends will love it. The 10×10 gazebo makes your space more enjoyable. It encourages outdoor relaxation, no matter the occasion.
Common Mistakes in Gazebo Assembly
Many make common mistakes during assembly. Not reading instructions is a big one. Each kit often includes specific steps. Skipping steps leads to problems later. Ensure proper tools are nearby. Using the wrong tools causes delays & frustration.
Another mistake is ignoring the site. Ensure the ground is level. A tilted base makes the gazebo unstable. Always check local guidelines for building. Failing to do so can result in removal. Learn from these common errors. Double-check everything for a smooth experience.
Choosing the Right Location for Your Gazebo
Location is crucial for your gazebo’s success. First, think about visibility. Placing it near the main house improves access. Guests will appreciate it. Next, consider sun & shade. You don’t want a spot too hot. Shade from trees or structures can help. And another thing, avoid placing it under power lines. Safety comes first.
Finally, think about your garden design. Pick a spot that enhances the overall look. A well-placed gazebo creates balance in your yard. Assess your surroundings carefully to find the perfect place.
Adding Value with a Gazebo
A gazebo increases your property value. Real estate experts agree this is true. Many buyers look for outdoor living spaces. A beautiful 10×10 gazebo can attract potential buyers. It adds charm & function.
People see it as a bonus. Not only does it offer relaxation, but also entertainment. Outdoor features enhance curb appeal. Investing in a gazebo is a smart choice for homeowners. Enjoy it now & reap rewards later.
Frequently Asked Questions About Gazebos
People often ask about gazebo care. What materials last the longest? Usually, wood treated with sealant endures better. Aluminum is also a great option. It resists rust & requires less maintenance.
Another common question concerns assembly time. How long does it take? Most installations take between 4-8 hours. Helping hands can speed up the process. Make sure you follow instructions closely.
“A gazebo can change your outdoor lifestyle.” – Emily Sanders
Many also wonder how to finance a gazebo. Various stores offer financing plans. You can also save & invest in it gradually. Look for discounts during seasonal sales for the best deals.
What materials do I need for assembling a 10×10 gazebo?
To assemble a 10×10 gazebo, you will need the gazebo kit which typically includes the frame, canopy, & connectors. And another thing, have tools such as a screwdriver, hammer, & a level on hand to assist in the assembly process.
How long does it take to assemble a 10×10 gazebo?
The assembly of a 10×10 gazebo generally takes about 2 to 4 hours, depending on the complexity of the design & the number of helpers available during the process.
Do I need help to assemble a 10×10 gazebo?
While individual assembly is possible, it is recommended to have at least one additional person to assist. This will make the process smoother & help ensure stability as you put the structure together.
What is the first step in assembling a 10×10 gazebo?
The first step in assembling a 10×10 gazebo is to lay out all the parts & tools in a clear area. This allows you to identify all components before starting the assembly process.
Are there any weather considerations when assembling a 10×10 gazebo?
Yes, it is best to assemble a 10×10 gazebo on a clear day with no rain or strong wind. This helps ensure safety & accuracy during the construction process.
Can I install the 10×10 gazebo on any surface?
A 10×10 gazebo can be installed on a variety of surfaces such as grass, concrete, or a patio. Be that as it may, ensure the ground is level & stable for optimal support.
What tools are required for 10×10 gazebo assembly?
Essential tools for a 10×10 gazebo assembly include a screwdriver, a hammer, a level, & a measuring tape. If applicable, a socket wrench may also be helpful for tightening bolts.
Is there a specific order to assemble a 10×10 gazebo?
Yes, typically you will start with the base, followed by erecting the frame, & finally attaching the canopy. Following the instructions provided in your specific gazebo kit is crucial.
What safety precautions should I take while assembling a 10×10 gazebo?
Wear safety goggles & gloves while assembling the 10×10 gazebo. Ensure the structure is stable during assembly to avoid accidents. And another thing, be mindful of your surroundings to prevent tripping hazards.
Can a 10×10 gazebo be disassembled for storage?
Yes, most 10×10 gazebos can be disassembled easily for storage. Always refer to the assembly instructions for guidance on how to take it apart correctly without damaging any components.
Conclusion
As we wrap up this guide on assembling your 10×10 gazebo, we hope you feel more confident about the process. Following these step-by-step instructions will help you create a cozy space in your backyard. Remember to gather all your materials & take your time during assembly. You’ll soon enjoy a lovely spot for relaxation & gatherings. Whether it’s sunny or rainy, your gazebo will be a great addition to your outdoor space. With a little effort, you’ll make cherished memories in your new gazebo. Happy assembling!