
Black Bugs vs Ladybugs on Vegetables: Identification & Control Tips. Control Tips & Identification spot Black Bugs vs Ladybugs on Vegetables.
Identifying Black Bugs on Vegetables
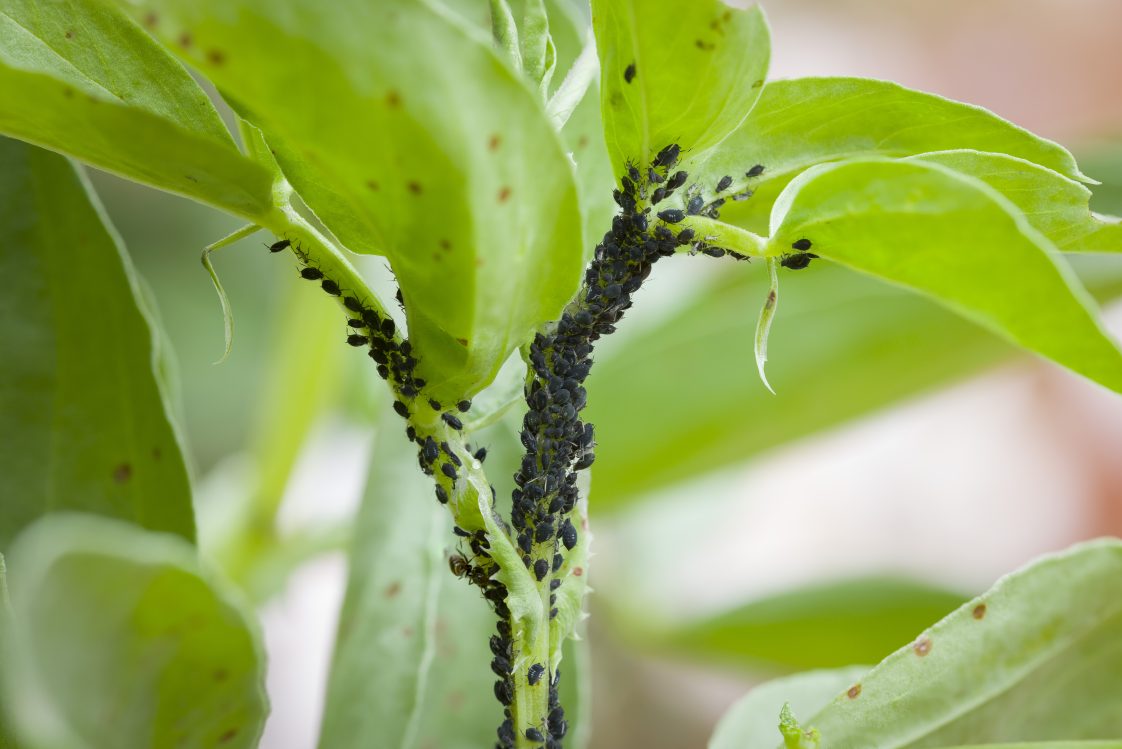
Growers spot various insects on leaves, stems, & fruit of home gardens or small farms. Among these, black bugs often raise concern because they feed on plant juices & can weaken vines, stems, & roots. These pests typically appear in clumps or rows on the undersides of foliage. Their bodies range from oval to elongated shapes, usually measuring between 4 & 12 millimeters. When touched, they may release a foul odor that deters predators. Numerous species fall under the label black bugs, including certain aphids, beetles, & stink bugs. While some harmless beetles display black coloring, the term here refers to sap-sucking or leaf-chewing types that target leafy greens, tomatoes, peppers, & beans.
Early recognition cuts damage by half. Scout weekly & record bug counts per plant. Check young leaves first, since soft tissue attracts them more than mature fruit. Search in dim light or early morning, when bugs slow movement. Note feeding scars tiny holes or yellowing along veins & count adults versus nymph stages to gauge infestation severity. Use hand lenses or clear jars to trap & inspect hidden crawlers.
| Feature | Black Bugs |
|---|---|
| Body Shape | Oval to elongated |
| Coloration | Matte dark brown or black |
| Size | 4–12 mm |
| Damage Type | Sap-sucking or chewing |
Recognizing Ladybugs & Their Benefits
Home gardeners welcome ladybugs for sunny spots; their bright, spotted exteriors provide a visual cue to their beneficial status. These insects, both in larval & adult stages, feed on aphids, mites, & scale, reducing the need for harsh chemicals. Larvae look like tiny alligators with spiny bodies, often dark with orange spots. Adult ladybugs carry distinctive red, orange, or yellow wing covers adorned with black spots. Ladybugs prefer to roam over leaves & stems, combing for soft-bodied pests.
Benefits of Ladybugs
- Consume thousands of aphids in their lifetime
- Attack eggs & larvae of common pests
- Reduce viral disease spread by lowering pest numbers
- Leave no chemical residues on vegetables
- Offer continuous control across seasons
- Attract other beneficial wildlife
- Require minimal maintenance once established
Differences Between Black Bugs & Ladybugs
Visual comparison highlights clear distinctions. Unlike neutral or vivid patterns of ladybugs, black bugs hide in clusters & mimic leaf shadows. Ladybugs usually travel alone or in small groups, whereas harmful black bugs pile on target leaves. Behavioral cues also vary: beneficial ladybugs march steadily, actively seeking prey, while pests often cling to a single area to feed. Some black bugs inject enzymes that break down plant cells, causing irregular leaf deformations & sticky honeydew. Ladybugs, on the other hand, leave no honeydew, since they consume sap feeders rather than plant tissue directly.
| Attribute | Black Bugs | Ladybugs |
|---|---|---|
| Movement | Stationary clusters | Active foragers |
| Color Pattern | Solid dark hues | Bright spots |
| Feeding Habit | Plant tissue or sap | Other insects |
| Damage Sign | Holes, yellowing | None |
Damage Caused by Black Bugs on Vegetables
Unchecked, black bugs reduce yields dramatically. They pierce cell walls & withdraw nutrient-rich fluids, leaving plants weak & stunted. On leafy greens, you’ll see windowpane effects thin, translucent patches where tissue collapsed. In fruiting crops like peppers & tomatoes, puncture spots signal future rot entry points. Young seedlings suffer most, since they lack reserves to recover. Heavy infestations cause defoliation, exposing fruit to sunscald & pests. In vine crops, yellowed patches trace along veins, & curling edges trap moisture, promoting fungal growth. Repeated feeding cycles lead to flower drop, misshapen fruit, & overall poor quality.
Signs of Infestation
- Sticky residue or honeydew on leaf surfaces
- Clusters of tiny nymphs on stems
- Yellowed veins or opaque spots
- Misshapen or deformed fruit
- Leaf curling & edge necrosis
- Visible dark insects grouping under foliage
- Early leaf drop in severe cases
- Secondary fungal infections on damaged tissue
Natural Control Tips Methods for Black Bugs
Biodiversity remains the best defense. Encouraging predators like lacewings, predatory beetles, & parasitic wasps cuts black bug populations quickly. Setting up birdhouses attracts insectivorous birds that feast on adult beetles & nymphs. Planting diverse flowering herbs such as dill, fennel, & yarrow supplies nectar to beneficial wasps that lay eggs inside aphids & leafhoppers. Neem oil & horticultural soaps create barriers without lasting soil residues.
| Predator or Method | Action | Benefit |
|---|---|---|
| Lacewing Larvae | Consume aphids & small caterpillars | Reduces sap-sucking insects |
| Ladybugs | Feed on eggs & nymphs | Continuous biocontrol |
| Neem Oil Spray | Disrupts bug feeding | Low toxicity to wildlife |
| Birdhouses | Attract insectivorous birds | Natural bug patrol |
Using Ladybugs as Biocontrol Agents
Release live ladybugs near infested rows in early morning or late evening when temperatures drop, so they stay longer. Provide shallow dishes of water with pebbles for safe drinking. Patience pays off: many will disperse to combine with local beneficial populations & patrol your vegetables for several weeks. To improve establishment, plant clusters of mint, calendula, & coreopsis, which release scents irresistible to ladybugs.
“Integrating ladybugs into a garden ecosystem transforms pest management into a self-replenishing system,” Stacey Metz.
Steps to Introduce Ladybugs
- Choose evening release for cooler conditions
- Keep release area moist but not waterlogged
- Spray a light mist on foliage before release
- Distribute beetles in small batches
- Provide flowering plants for nectar & pollen
- Monitor population weekly
- Reapply if numbers decline below threshold
Cultural Practices to Prevent Black Bug Infestations
Crop rotation breaks pest cycles by moving susceptible vegetables to fresh ground. Introducing cover crops like mustard or buckwheat in fall deprives overwintering stages of hosts. Regularly tilling between rows disturbs pupae in soil. Avoid overhead irrigation in mid-afternoon to reduce high-humidity pockets that attract sap feeders. Keep weeds at bay; ground cover plants often harbor early-stage nymphs. Create clean field edges; fallen debris can shelter eggs & larvae. Harvest ripe fruit promptly to deny bugs a sustained food source.
| Practice | Implementation | Effect |
|---|---|---|
| Crop Rotation | Change plant families yearly | Breaks pest life cycle |
| Cover Crops | Rotate in off-season | Reduces overwintering spots |
| Regular Tillage | Loosen soil biweekly | Disturbs pupae |
| Weed Management | Hand-pull monthly | Lowers alternate hosts |
Chemical Control Tips & Precautions
Selective insecticides target sap feeders while sparing beneficial insects. Choose products containing insecticidal soaps, pyrethrin, or spinosad. Always read labels for application rates & safety intervals. Avoid broad-spectrum chemicals that eliminate natural predators & disrupt pollination. Apply treatments in early morning, when bees remain in hives. Rotate active ingredients every 30 days to deter resistance. Wear gloves & protective eyewear, & keep children or pets away until sprays dry completely.
Key Safety Measures
- Confirm product labels specify vegetable crop use
- Maintain recommended spray intervals
- Store chemicals in locked, cool areas
- Dispose of empty containers per local regulations
- Mix only required volume for immediate use
- Keep drift off neighboring blooms
- Wash hands & tools after application
Monitoring & Early Detection Strategies
Weekly scouting lets gardeners catch pest buildup before it explodes. Walk rows in zigzag patterns, examining 10 random plants per bed. Use yellow sticky traps at canopy level to intercept flying adults. Label traps with date & count captured bugs to track population trends. Record findings in a journal with photos to reference seasonal patterns. Compare counts against established thresholds; for instance, finding more than five aphids per leaf signals treatment. Adjust inspection frequency during warm spells, when bug metabolism speeds reproduction. Check soil surface for pupal shells & adult beetles emerging in spring.
| Tool or Method | Purpose |
|---|---|
| Yellow Sticky Traps | Intercept flying pests |
| Hand Lens | Magnify small nymphs |
| Field Journal | Track infestation levels |
| Threshold Charts | Guide intervention timing |
Seasonal Considerations for Pest Management
Spring warmth prompts first waves of egg-laying insects. Apply dormant oil sprays to crevices before buds open to smother overwintering eggs. In summer, focus on biocontrol agents: release lacewings & ladybugs after nightfall for maximum establishment. Late summer storms can wash off both pests & beneficials, so inspect gardens after heavy rain. In fall, remove crop residues promptly to eliminate overwintering shelters. Late-season cover crops can trap migrating bugs & concentrate them for removal before winter.
Seasonal Actions
- Early Spring: Dormant oil on trunks & stems
- Late Spring: Begin weekly scouting
- Mid-Summer: Release biocontrol insects
- Late Summer: Reapply neem or soaps after rains
- Early Fall: Clear debris & plow lightly
- Late Fall: Sow cover crops for winter
Integrating Multiple Control Tips Methods
Combining cultural practices, natural enemies, & targeted sprays yields the best defense. For example, interplanting basil & marigold repels some leaf-chews while attracting predators to feast on aphids. Pair sticky traps with periodic soap sprays to knock back survivors. When using insecticides, schedule applications to avoid newly introduced ladybugs & lacewings. Keep a balanced ecosystem by avoiding monoculture & staggering planting dates. That way, pest peaks on one crop won’t coincide with the entire garden’s vulnerability.
| Method Combination | Sequence | Expected Outcome |
|---|---|---|
| Crop Diversity + Biocontrol | Plant mix → Release insects | Lower pest density |
| Sticky Traps + Soap Spray | Trap → Spot spray | Quick knockdown |
| Cover Crop + Tillage | Grow → Incorporate | Remove soil stages |
Common Mistakes in Pest Identification & Control Tips
Gardeners sometimes mislabel harmless larvae or beneficials as pests, leading to overapplication of chemicals. Rushing into broad-spectrum sprays can eliminate predator populations permanently. Mistaking early instar ladybug larvae for aphids also triggers unnecessary treatment. Similarly, confusing minute black beetles that feed on fungal spores with damaging sap feeders reduces natural disease control. Always confirm identity using clear photos or reference guides before taking action. Accurate labels ensure each measure targets only harmful species without collateral damage.
Frequent Errors
- Spraying every insect-harboring leaf
- Not alternating active ingredients
- Releasing biocontrol insects into barren sections
- Ignoring threshold data from sticky traps
- Failing to remove plant debris
- Overlooking early nymph stages
Optimizing Garden Layout to Discourage Black Bugs
Garden design influences pest dynamics. Wide paths improve airflow, drying leaves quickly & making conditions less favorable for sap feeders. Raised beds warm soil & speed plant growth, giving vegetables a head start over bugs. Position strong-smelling herbs like garlic & chives along edges to mask crops’ scents. Establish trap crops plants more attractive to pests than main crops to concentrate bugs away from prized rows. Afterward, remove trap crop entirely. Use reflective mulches to confuse flying beetles, preventing them from locating host plants easily.
| Design Element | Benefit |
|---|---|
| Wide Walkways | Improved air circulation |
| Raised Beds | Warmer soil, faster growth |
| Trap Crops | Draw pests away |
| Reflective Mulch | Disorients flying insects |
Leveraging Companion Planting for Natural Pest Defense
Companion plants can repel black bugs & invite beneficial predators. Marigolds exude limonene, deterring leaf hoppers. Basil releases eugenol, which confuses stink bugs & aphids. Dill & cilantro host hoverfly larvae, voracious consumers of pests. Interspersing these aromatic herbs with vegetable rows creates a multi layered defense. Place mint in pots to curb its spread, then situate near tomato or pepper beds for extra protection. Rotate herbal pockets every season to maintain diverse chemical signals that pests cannot adapt to quickly.
Effective Pairings
- Tomatoes + Basil for aphid control
- Beans + Marigold for beetle deterrence
- Cucumbers + Dill to attract lacewings
- Peppers + Cilantro to lure hoverflies
- Leafy greens + Chives to mask scent
- Squash + Oregano for fungal shading
Physical Characteristics That Set Them Apart
Identifying Black Bugs vs Ladybugs on Vegetables: Identification & Control Tips starts with spotting unique body shapes, colors, & movement patterns. Black bugs, often aphids or flea beetles, display squat, compact forms & cling tightly to leaf undersides. Ladybugs boast rounded domes & glide across foliage, exposing their brightly hued elytra. Pay attention to antenna length, leg orientation, & body segmentation. Black bugs frequently present muted hues, such as deep charcoal or olive green, & their bodies appear waxy when covered in defensive secretions. Ladybugs glow with reds, oranges, or yellows decorated by distinctive black spots. Observing how these insects shift under bright daylight versus low light can reveal textural differences: ladybug shells remain glossy, while black-bug exoskeletons may appear matte or fuzzy. Wing deployment offers another clue ladybugs lift their wing cases fully to take flight, while black bugs open softer wing pads with less fanfare. Learning these simple visual cues equips gardeners to take swift action.
Key Features
- Antenna length: short & straight for black bugs, slightly clubbed for ladybugs
- Body shape: elongated or oval for black bugs, hemispherical for ladybugs
- Color pattern: uniform dark for black bugs versus spotted bright elytra for ladybugs
- Leg orientation: tucked close for black bugs, more splayed for ladybugs
- Shell sheen: matte or waxy on black bugs, glossy on ladybugs
- Defensive coating: black bugs may appear powdery, ladybugs remain smooth
- Flight motion: abrupt & rapid for black bugs, gliding & arching for ladybugs
Preferred Habitats in Your Vegetable Garden
Locating where these insects hide helps you target inspections & treatments efficiently. Black bugs congregate where new growth emerges tender buds, soft shoots, & leaf axils harbor their colonies. Ladybugs seek nectar from flowers & shelter beneath mulch during the hottest midday hours. Recognizing these habitat preferences guides gardeners to problem zones quickly. Check dense foliage around tomato vines or pepper plants for black bugs, while ladybugs often linger near marigolds & dill. Dry, windy patches discourage black-bug settlement, but ladybugs can brave light breezes. Moisture levels also matter: high humidity favors black-bug proliferation, so overhead watering may inadvertently assist them. Ladybugs, Be that as it may, tolerate drier sites as long as prey insects exist. Tracking these patterns sharpens your scouting routine, reducing guesswork & preventing surprises.
Habitat Comparison
| Location | Attraction |
|---|---|
| Leaf axils & new shoots | Black bugs feed on sap in tender tissue |
| Flower petals & nectar-rich blooms | Ladybugs hunt pollen & small prey |
| Lower leaf undersides | Black bugs avoid predators |
| Ground cover & mulch | Ladybugs rest during heat |
| Humid corners near irrigation | Black bugs thrive in moisture |
Feeding Behaviors & Damage Signs
Monitoring leaf damage indicates which group dominates. Black bugs pierce leaf tissues, leaving translucent speckles, yellowing patches, & curling edges. Their feeding injects saliva that distorts plant cells, creating irregular blotches or galls. Look for sticky honeydew trails hardened by sooty mold growth. Ladybugs consume pest insects rather than plant tissue; you’ll spot fewer holes in foliage when ladybugs patrol. Instead, their presence correlates with reduced aphid clusters & minimal leaf yellowing. Ladybugs clean surfaces as they feed, often leaving no residue beyond tiny shell fragments. Observing either chewed edges or an absence of typical sap-sucking symptoms signals which visitor controls or damages your veggies.
Damage Indicators
- Translucent spots on leaves
- Yellow or brown leaf margins
- Leaf curling or wrinkling
- Sticky residue from honeydew secretions
- Sooty mold development around feeding sites
- Presence of prey insects reduced by ladybug hunting
- Scattered shell remnants after ladybug emergence
Life Cycle Variations
Understanding breeding timelines helps schedule interventions before populations surge. Black bugs can complete multiple generations in a single season, with eggs laid on leaf undersides maturing to nymphs, then adults in just weeks. Clusters of yellow or cream eggs form along veins, often unnoticed until hatch time. Ladybugs follow a more prolonged sequence: they lay individual yellow eggs in clusters near prey sources, & larvae spend days consuming pests before pupating in sheltered spots. Pupal stages last about a week, then adult ladybugs emerge & often enter a brief dispersal phase before feeding. Tracking these cycles reveals windows when biological controls or treatments yield maximum impact.
Cycle Stages
| Stage | Details |
|---|---|
| Egg | Black bugs lay clusters on leaf undersides |
| Nymph/Larva | Juveniles feed voraciously; black bugs progress through instars faster |
| Pupa | Ladybug larvae attach to stems to transform |
| Adult | Black bugs reproduce within days; ladybugs need moderate maturation |
| Reproduction | Multiple black-bug generations vs. single ladybug brood peaks |
Timing Your Inspections
Scouting at regular intervals catches infestations early. Start weekly surveys in spring when seedlings show true leaves, focusing on a rotating schedule across different crop rows. Midday inspections reveal black-bug nymph clusters in bright light, while early-morning checks uncover dew-laden webs & snail trails. Ladybugs gather near flower clusters in late afternoon, so examine blooms at that time. As fruiting begins, double the frequency to twice weekly & record observations in a journal. Note population spikes by date & location to anticipate treatment needs. Pair these logs with weather conditions after rain, black-bug numbers may surge, & during dry spells, ladybugs may relocate. Structured inspection routines reduce surprises & increase your success in controlling damaging insects.
Inspection Schedule
- Weekly whole-garden scan from seedling emergence to flowering
- Midday focus on leaf undersides for black-bug clusters
- Early-morning dew checks for sticky honeydew
- Late-afternoon flower examination for ladybug presence
- Twice-weekly checks during fruit set & ripening
- Record date, crop stage, weather, & insect counts
Cultural Practices to Discourage Infestation
Implementing site-specific routines reduces shelter opportunities for pests. Rotate crops annually to break black-bug reproductive cycles that rely on host familiarity. Incorporate organic matter by adding compost, which supports natural predator populations. Avoid over-fertilizing with high-nitrogen blends, since succulent growth attracts black bugs. Instead, use balanced nutrients & maintain moderate leaf density. Thinning crowded plants improves airflow, reducing humidity that black bugs prefer. Harvest ripe produce promptly to prevent honeydew buildup. Ladybugs thrive when predator prey such as aphids exist, so allow low-level populations on sacrificial plants to sustain beneficial insects before eliminating them. These cultural shifts build resilience in your vegetable patch.
Recommended Methods
| Practice | Benefit |
|---|---|
| Crop rotation | Prevents black-bug population buildup |
| Compost application | Boosts beneficial insect habitat |
| Balanced fertilization | Limits tender growth that pests favor |
| Plant thinning | Improves airflow & reduces humidity |
| Timely harvesting | Removes honeydew attractants |
Introducing Natural Predators
Encouraging predatory species keeps pest numbers in check without chemicals. Lacewings, predatory mites, & parasitic wasps target black bugs, disrupting their reproductive ability. Gardeners can buy these beneficials & release them strategically near infested zones, following label instructions to ensure high survival rates. Ladybugs themselves act as strong biological controls by consuming large volumes of aphids & scale insects. Provide habitats that support these allies: plant insectary beds with buckwheat, coriander, or alyssum to supply nectar & pollen. Install small dilapidated branches & leaf piles to offer shelter during nonfeeding periods. By amplifying predation, you create a continuous defense network that adapts to shifts in pest pressure.
Beneficial Allies
- Lacewings: predators of aphids & small caterpillars
- Parasitic wasps: control scale, whitefly, & certain aphid species
- Predatory mites: consume thrips & spider mites
- Ladybugs: voraciously feed on multiple pest insects
- Ground beetles: target soil-dwelling larvae of beetles & caterpillars
- Syrphid fly larvae: similar appetite for aphids
Black Bugs vs Ladybugs on Vegetables: Identification & Control Tips offers practical guidance that transforms any garden into a healthier ecosystem.” – Stefanie Gutkowski
Organic Sprays & Homemade Solutions
Creating gentle mixes from kitchen staples addresses black-bug outbreaks while sparing ladybugs. Soap sprays break down insect exoskeletons & remove honeydew residue. Mix one tablespoon of pure liquid soap per quart of water, then apply directly to infested leaves. Neem oil disrupts feeding & reproduction; use at two tablespoons per gallon of water with a few drops of soap as an emulsifier. Garlic-infused concoctions add repellent qualities steep minced garlic in hot water for 24 hours, strain, & dilute at one part infusion to ten parts water. Always spray during cool hours to protect beneficials & repeat applications every five days until populations decline.
Safe Spray Recipes
| Recipe | Ingredients & Directions |
|---|---|
| Soap Spray | 1 tbsp liquid soap + 1 qt water; shake well |
| Neem Blend | 2 tbsp neem oil + 1 gal water + pinch of soap |
| Garlic Infusion | 1 minced garlic bulb steeped in 1 cup water; dilute 1:10 |
| Chili Pepper Mix | 1 tbsp chili flakes steeped, strained, dilute 1:9 |
| Horseradish Solution | 2 tbsp grated horseradish + 1 qt water; strain & spray |
Effective Trapping Techniques
Deploying targeted traps intercepts black bugs before they spread across plants. Yellow sticky cards hung at foliage height attract flying black bugs & thrips. Place cards every ten feet along row edges. For ground-dwelling invaders, bury jar traps filled with soapy water flush with soil, which draws crawling pests. Fill small bowls with beer & place near watermelons or squash; slug-like black bugs are drawn by the yeast scent & drown. Ladybugs rarely contact these traps if you position them carefully away from flowering areas to minimize collateral impact.
Trap Options
- Yellow sticky cards hung at plant canopy level
- Soapy water jar traps buried flush with soil line
- Beer-baited shallow dishes near vine crops
- Light traps for nocturnal black-bug species
- Pitfall traps lined with sticky tape for ground crawlers
Utilizing Row Covers for Protection
Row covers provide a physical barrier that blocks black bugs while allowing sunlight & water. Lightweight spunbond fabrics allow vegetables to breathe but keep small pests at bay. Secure edges with soil or pins to prevent crawling insects from entering. Remove covers during flowering to enable pollination, then replace immediately to protect developing fruit. Row covers also reduce wind & UV stress, creating a microclimate that supports steady growth. Monitor temperature beneath the cover; ventilate if midday heat spikes. This approach minimizes reliance on sprays & integrates well with other control methods.
Cover Strategies
| Cover Type | Usage Tips |
|---|---|
| Lightweight spunbond fabric | Use from seedling to pre-flower stage |
| Agribon covers | Allow higher UV transmission, regular checks |
| Garden netting | Good for larger pests on vine crops |
| Floating row cover | Requires securing edges with soil mounds |
| Reflective mulch under-cover | Deters black bugs visually |
Handpicking & Manual Removal
When infestation levels remain low, direct removal saves time & reduces chemical use. Wear gloves & inspect leaves, stems, & buds carefully. Drop any spotted black bugs or eggs into a bucket of soapy water. Gently shake infested branches over a collection tray to dislodge hidden nymphs. Between knocks, inspect the debris & repeat if necessary. Handpicking works best early in the morning when black bugs move slowly. Dispose of trapped bugs away from the garden to prevent reinfestation. This hands-on method also allows you to observe ladybug larvae feeding, reinforcing beneficial insect populations.
Removal Tips
- Inspect plants early in the morning
- Wear gloves to protect skin
- Drop pests into soapy water bucket
- Shake branches over container to dislodge eggs
- Check removed material for surviving nymphs
- Relocate ladybug clusters to unaffected areas
Leveraging Companion Planting
Planting garlic, calendula, or tansy alongside vegetables repels many black-bug species through strong scents. Nasturtiums draw aphids away as trap crops, preserving main crop integrity while attracting ladybugs. Interplant basil among tomatoes to ward off flea beetles, & sow dill patches to sustain parasitic wasp populations. Rotate these companions each season to prevent soil-borne pests. Dense interplanting can mask your veggie crop from flying black bugs, while flowering edges provide continuous nectar sources for adult ladybugs. This mosaic arrangement creates a balanced ecosystem where pests struggle to locate vulnerable hosts.
Plant Pairings
| Companion | Benefit |
|---|---|
| Garlic | Repels aphids & beetles |
| Calendula | Attracts predatory insects |
| Nasturtium | Acts as trap crop for aphids |
| Basil | Deters flea beetles |
| Dill | Supports parasitic wasps |
Monitoring Weekly Progress
Tracking pest & predator counts over time reveals trends that inform adjustments. Create a simple spreadsheet listing plant types, inspection dates, black-bug counts, ladybug sightings, & weather conditions. Color-code entries to highlight problem areas or successful control measures. Review weekly data to identify spikes indicating treatment needs or declines confirming effective techniques. Sharing charts with fellow gardeners can spark new ideas. Consistent data collection elevates your management from reactive to proactive, saving both time & harvest quality over multiple seasons.
Tracking Metrics
- Date of inspection
- Room or bed location
- Number of black bugs per leaf
- Ladybug & larval counts
- Weather conditions (temperature, humidity)
- Control measures applied
- Harvest yield notes
Post-Harvest Storage Precautions
After harvesting, inspect produce for hidden insects to prevent storage infestations. Gently rinse vegetables with diluted neem oil solution to remove any lingering black-bug eggs. Store bulbs & root crops in cool, dry areas free of direct sunlight. Avoid stacking produce directly on wood surfaces; use clean plastic trays or paper-lined crates. Regularly rotate stored items to catch early signs of spoilage or insect movement. Proper storage safeguards your efforts in the field & maintains food quality until consumption.
Storage Guidelines
| Produce TypeStorage Tip | |
|---|---|
| Tomatoes | Store at room temperature away from direct sun |
| Peppers | Keep in dry crate with ventilation holes |
| Root Vegetables | Line bins with paper to absorb moisture |
| Leafy Greens | Wrap in damp cloth & refrigerate |
| Herbs | Hang upside-down in bundles in dry area |
Personal Experience & Final Reflection
I remember the first season I noticed black bugs overwhelming my pepper plants, & I felt overwhelmed until I applied the techniques from Black Bugs vs Ladybugs on Vegetables: Identification & Control Tips. I set up yellow sticky traps & recorded daily counts, then planted marigolds to lure ladybugs into my plot. As I released lacewings & sprinkled neem spray during early morning hours, I watched black-bug colonies shrink rapidly. I kept a simple journal & adjusted my watering schedule to discourage high humidity that favored pests. By midsummer, my garden thrived with healthy tomatoes & basil, free of the characteristic splotches & honeydew that once plagued it. This hands-on approach taught me the value of combining observation, cultural care, & biological allies. Every gardener can replicate these steps to achieve a balanced, pest-resistant vegetable patch without relying on harsh chemicals.

Conclusion
Dealing with black bugs & spotting ladybugs can feel confusing at first. Black bugs often eat leaves & harm plants, while ladybugs feed on harmful pests & protect your veggies. Start by checking plant leaves daily for signs of damage or small insects. If you see black bugs, try rinsing them off with water or using safe soap sprays. Keep soil clean & avoid overwatering to cut pest numbers. Encourage ladybugs by planting flowers like marigolds & daisies nearby. With simple checks, water treatments, & friendly insects, you can keep your vegetable patch healthy & thriving. Enjoy watching plants grow.